Thursday, November 21, 2013

Track Template is ready for construction

After finishing the prep in the house for the arrival of our Au Pair and a bit of a chill afterwards, the last few evenings have been taken up by preparing a more detailed and thorough track template onto which I am going to build my track work.

Tower Street Station Track Template

This is the track template as it stands. I have tidied up the geometry of most of the curves and have added 3.3mm regular sleepers in black and 4mm turnout timbers in green.

I am planning to get it done in one hit and hopefully build it as the lengths bullhead rail come thus keeping track joins to a minimum to increase the rigidity of the track work, well that's the plan anyway! Being a DCC controlled layout there will be a minimum of cuts in the rail, as there will be no isolating sections, just the ones needed at the baseboard joins and on the point work.

The only experience I have had of making any track work is at Cardiff MES, of which I am a member, and have assisted in producing a couple of points on a complicated section of track on the approach to the station on the layout that is currently under construction.

I am a bit of a perfectionist and with the aid of my template I'm sure I will be able to produce some good quality results if I take it one step at a time and don't rush things.

All I need to do now is persuade my find to print it out full size as he did with the track plan and the building will commence!

The track layout of Tower Street station can be found here.

Saturday, October 19, 2013

A new home for Tower Street and the arrival of a small package


The lack of recent posts is due to the imminent arrival of an au pair to our family, we have an Italian girl arriving to help with the kids on the 2nd of November and thus, most of our house has been changed around. The kids have moved from a small bedroom and seperate playroom into a what was the hobbies / office space, we have moved into what was the playroom, which always had our wardrobes in it. Our bedroom will be for the au pair and what was the small kids room is now the office and hobbie space. I was fearing that I would have to loose the ability to keep the layout permanently setup, it is a little crampt in the room but there is enough space for the desk and layout plus a small beuro and a storage unit for paperwork. The room already had a sliding door which means we don't need to keep a space for the door to swing open. Of course, there won't be enough room to have the fiddle yard attached but it doesn't need to be while I am building the track and scenery. 

At long last, arriving today, came my order of 1000 SMP copper clad sleepers and two packs of turnout timbers. I say at long last because like with most things on my todo list I manage to procrastinate and put off what I should be tackling next. It mostly happens with stuff that I have yet to try. Being a perfectionist, I don't like messing things up and I hate the thought of messing on the layout, even though it is my first try and shouldn't worry about making mistakes. It was the same with spraying the first batch of models I had started and the first attempt at applying transfers. Well, they have arrived and with the pack of code 75 bullhead rail I purchased from C&L at the Bristol show, I have no excuse not to start track laying!

Saturday, September 14, 2013

K's Kits GWR 6 Wheel Low Siphon Completed...

... Well mostly completed, again as with the other models I have been working on of late, I have yet to add screw link couplings, but apart  from this, the model is pretty much there.


Pete Bevan's K's Kits GWR 6 Wheel Low Siphon

Talking about screw link couplings, I have been searching the net for some appropriate couplings, I find the Smiths screw links too coarse, using a small  tack as the adjustment bar, other offerings include Romford's which at £4 per pair, are way out of my league, or Scalescenes at £1.00 a pair which are better priced but not as prototypical as the ones available from Roxley Mouldings that work out at just .83p per pair. Smiths do have a Mk2 version of their screw link couplings which are listed on a few websites at around £1.80 per pair but they don't seem to have been released yet.

Pete Bevan's K's Kits GWR 6 Wheel Low Siphon

As can be seen I have added a Bachmann tension lock coupling at one end to improve compatibility which has been placed in a Parkside Dundas NEM mounting block. This will allow me to run guest stock or any stock that I haven't already converted to three link couplings. I have added vac pipes by Romford, and will be posting a tutorial in due course on how to quickly make these from scrap coax and telephone cable.

Pete Bevan's K's Kits GWR 6 Wheel Low Siphon

The paint used was Humbrol enamel matt chocolate brown No.98. In the pics it looks dark and rich but in real life it looks a little lighter and dustier, which I think will look the part once a bit of weathering has been applied. Transfers are from the HMRS Methfix range and went on with ease after Mikkel of the Farthing Layouts fame pointed me in the right direction concerning the tare weight.

As can be seen in a couple of the shots above, I have used some Peco milk churns, the photo below showing how they have been lined up to hide the lead ballast weight. The churns have not been fixed in place yet, I'm waiting until I have finished weathering, I then will secure them to both sides of the van. I'm not sure how accurate the Peco mouldings are but these will be fine as they are mostly hidden from sight.

Pete Bevan's K's Kits GWR Low Siphon  

The 14mm Maunsell wheel sets are by Romford. I have filed off the flanges of the middle wheel set to allow for unhindered running on smaller radius curves, even in the photos above off the track it fillet to both edges to allow the wheel to slide on or off the track as it goes around corners without any noticeable effect.

It is a straight forward Kit to build, although some of the details of the prototype have been left out of the kit, there is plenty of other detail to make an interesting looking model. Keep your eyes peeled on ebay and you may be able to pick one up!


Thursday, August 22, 2013

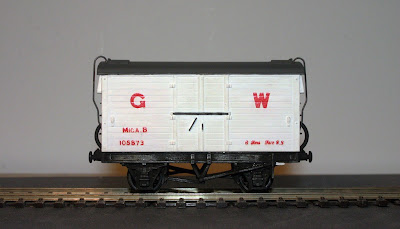
Detailed Wrenn GWR Dia. X7 Mica B Refrigerated Van


Pete Bevan Detailed Wrenn GWR Dia. X7 Mica B Refrigerator Van

I picked up this Mica B a couple of years ago on ebay, did nothing with it until this week.


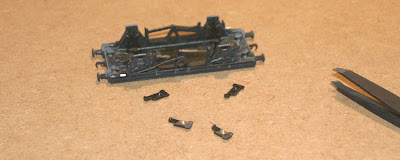
This is the model in its original unpainted condition, mine was grubbier than this. The first thing I did was to remove the existing lettering then dismantled the model, sprayed the underframe black and painted the brake handle white. 

After this I added bearings to the little plastic inserts and fixed some extra ballast in the way of lead strip. The underframe is a one piece metal casting and the inserts provide a way of installing the wheel sets as there is no way that the axle boxes can be bent out to slip them in place.

Pete Bevan Detailed Wrenn GWR Dia. X7 Mica B Refrigerator Van Underframe

After this attention turned to the body which received a couple of coats of white while the roof was repainted grey, followed by painting the detail on the door fasteners, handles and the steps on the ends.


Pete Bevan Detailed Wrenn GWR Dia. X7 Mica B Refrigerator Van In Progress

Next came the transfers, with which I copied the livery of the Mica B at the Severn Valley Railway.

Pete Bevan Detailed Wrenn GWR Dia. X7 Mica B Refrigerator Van

Romford vac pipes were added as were the coupling hooks ready for some Smiths Mk 2 screw link couplings. Finally the grab rails were repositioned, the cast instruction plates on the ends of the van were painted red and new wheel sets were fitted.

Pete Bevan Detailed Wrenn GWR Dia. X7 Mica B Refrigerator Van

Obviously this won't pass as a fine scale model but I have enjoyed the detailing process and breathing some new life into this RTR offering.

Tuesday, August 06, 2013

My First Pair of Wagons Completed!


Pete Bevan's Cambrian Models GWR Dia. T13 Chaired Sleeper Wagons

After all this time, I have finally completed my first pair of wagons! A pair of Cambrian Models GWR Dia. T13 Chaired Sleeper wagons. After the previous rush of primed wagons, I pushed straight on to painting these in black.

Pete Bevan's Cambrian Models GWR Dia. T13 Chaired Sleeper Wagons


There seems to be some doubt that engineers wagons were actually painted black, but all of the ones that I have seen photos of in preservation are in black livery. The lettering schemes tend to differ too and in the end I mostly followed the instructions that came with the kit.

I have never attempted to number a wagon before and I'm quite pleased with my efforts. I could have chosen an easier model to start with, the delicate stanchions and tight spaces certainly made it more tricky than it could have been!

Pete Bevan's Cambrian Models GWR Dia. T13 Chaired Sleeper Wagons


I used HMSR Methfix transfers which I am happy with and will probably use from now on unless there is a specific transfer I need that isn't catered for in the HMRS range. Applying the tare and running numbers took an age, the numbers being 100712 and 100716, applying each number individually then waiting for the meths to dry and washing off the backing paper and waiting for that to dry before starting on the next number. The numbers on the ends were started on the left and right and met in the middle to speed those ones up a bit.

Overall I am happy with the way the wagons have turned out. All that is left to do is to fix some screw link couplings in place and to do some weathering, oh and make up the all important chaired sleeper load!
Related Posts Plugin for WordPress, Blogger...