Showing posts with label GWR. Show all posts

Saturday, September 14, 2013

K's Kits GWR 6 Wheel Low Siphon Completed...

... Well mostly completed, again as with the other models I have been working on of late, I have yet to add screw link couplings, but apart  from this, the model is pretty much there.


Pete Bevan's K's Kits GWR 6 Wheel Low Siphon

Talking about screw link couplings, I have been searching the net for some appropriate couplings, I find the Smiths screw links too coarse, using a small  tack as the adjustment bar, other offerings include Romford's which at £4 per pair, are way out of my league, or Scalescenes at £1.00 a pair which are better priced but not as prototypical as the ones available from Roxley Mouldings that work out at just .83p per pair. Smiths do have a Mk2 version of their screw link couplings which are listed on a few websites at around £1.80 per pair but they don't seem to have been released yet.

Pete Bevan's K's Kits GWR 6 Wheel Low Siphon

As can be seen I have added a Bachmann tension lock coupling at one end to improve compatibility which has been placed in a Parkside Dundas NEM mounting block. This will allow me to run guest stock or any stock that I haven't already converted to three link couplings. I have added vac pipes by Romford, and will be posting a tutorial in due course on how to quickly make these from scrap coax and telephone cable.

Pete Bevan's K's Kits GWR 6 Wheel Low Siphon

The paint used was Humbrol enamel matt chocolate brown No.98. In the pics it looks dark and rich but in real life it looks a little lighter and dustier, which I think will look the part once a bit of weathering has been applied. Transfers are from the HMRS Methfix range and went on with ease after Mikkel of the Farthing Layouts fame pointed me in the right direction concerning the tare weight.

As can be seen in a couple of the shots above, I have used some Peco milk churns, the photo below showing how they have been lined up to hide the lead ballast weight. The churns have not been fixed in place yet, I'm waiting until I have finished weathering, I then will secure them to both sides of the van. I'm not sure how accurate the Peco mouldings are but these will be fine as they are mostly hidden from sight.

Pete Bevan's K's Kits GWR Low Siphon  

The 14mm Maunsell wheel sets are by Romford. I have filed off the flanges of the middle wheel set to allow for unhindered running on smaller radius curves, even in the photos above off the track it fillet to both edges to allow the wheel to slide on or off the track as it goes around corners without any noticeable effect.

It is a straight forward Kit to build, although some of the details of the prototype have been left out of the kit, there is plenty of other detail to make an interesting looking model. Keep your eyes peeled on ebay and you may be able to pick one up!


Thursday, August 22, 2013

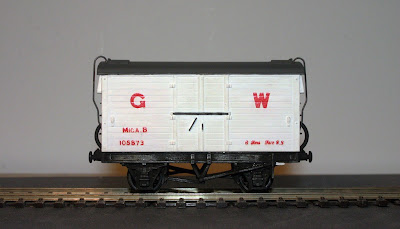
Detailed Wrenn GWR Dia. X7 Mica B Refrigerated Van


Pete Bevan Detailed Wrenn GWR Dia. X7 Mica B Refrigerator Van

I picked up this Mica B a couple of years ago on ebay, did nothing with it until this week.


This is the model in its original unpainted condition, mine was grubbier than this. The first thing I did was to remove the existing lettering then dismantled the model, sprayed the underframe black and painted the brake handle white. 

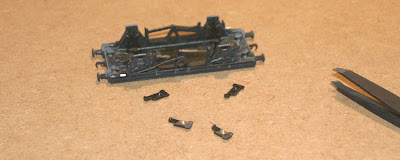
After this I added bearings to the little plastic inserts and fixed some extra ballast in the way of lead strip. The underframe is a one piece metal casting and the inserts provide a way of installing the wheel sets as there is no way that the axle boxes can be bent out to slip them in place.

Pete Bevan Detailed Wrenn GWR Dia. X7 Mica B Refrigerator Van Underframe

After this attention turned to the body which received a couple of coats of white while the roof was repainted grey, followed by painting the detail on the door fasteners, handles and the steps on the ends.


Pete Bevan Detailed Wrenn GWR Dia. X7 Mica B Refrigerator Van In Progress

Next came the transfers, with which I copied the livery of the Mica B at the Severn Valley Railway.

Pete Bevan Detailed Wrenn GWR Dia. X7 Mica B Refrigerator Van

Romford vac pipes were added as were the coupling hooks ready for some Smiths Mk 2 screw link couplings. Finally the grab rails were repositioned, the cast instruction plates on the ends of the van were painted red and new wheel sets were fitted.

Pete Bevan Detailed Wrenn GWR Dia. X7 Mica B Refrigerator Van

Obviously this won't pass as a fine scale model but I have enjoyed the detailing process and breathing some new life into this RTR offering.

Tuesday, August 06, 2013

My First Pair of Wagons Completed!


Pete Bevan's Cambrian Models GWR Dia. T13 Chaired Sleeper Wagons

After all this time, I have finally completed my first pair of wagons! A pair of Cambrian Models GWR Dia. T13 Chaired Sleeper wagons. After the previous rush of primed wagons, I pushed straight on to painting these in black.

Pete Bevan's Cambrian Models GWR Dia. T13 Chaired Sleeper Wagons


There seems to be some doubt that engineers wagons were actually painted black, but all of the ones that I have seen photos of in preservation are in black livery. The lettering schemes tend to differ too and in the end I mostly followed the instructions that came with the kit.

I have never attempted to number a wagon before and I'm quite pleased with my efforts. I could have chosen an easier model to start with, the delicate stanchions and tight spaces certainly made it more tricky than it could have been!

Pete Bevan's Cambrian Models GWR Dia. T13 Chaired Sleeper Wagons


I used HMSR Methfix transfers which I am happy with and will probably use from now on unless there is a specific transfer I need that isn't catered for in the HMRS range. Applying the tare and running numbers took an age, the numbers being 100712 and 100716, applying each number individually then waiting for the meths to dry and washing off the backing paper and waiting for that to dry before starting on the next number. The numbers on the ends were started on the left and right and met in the middle to speed those ones up a bit.

Overall I am happy with the way the wagons have turned out. All that is left to do is to fix some screw link couplings in place and to do some weathering, oh and make up the all important chaired sleeper load!

Thursday, August 01, 2013

Prime Time Viewing


As promised, I have actually primed my first batch of wagons. Here we have two Ratio iron minks, two Ratio open C tube wagons, two Cambrian Models Dia. N30 loco coal wagons, a Cooper Craft Dia. 04 open five plank wagon with sheet rail, another Cooper Craft open, this time a Dia. 05 open 4 plank wagon, a Cooper Craft Dia. V5 Mink Van, Also here is the Ian Kirk V7 Mink C van described in a previous post and the underframe of a Mainline Mogo van, on which I have replaced the original couplings with three links.

I used Halfords grey plastic primer from a can which went on nice and easily, the primer has really bought out a lot of the details, especially the rivet detail on the iron minks. The flat finish showing the relief of the mouldings much better than the satin finish of the plastic.


I have also sprayed the two Cambrian Models Dia. T13 Chaired Sleeper wagons, below is a sneak peek of the black finish and progress of applying the transfers.


Next post I hope to show the finished sleeper wagons...

Wednesday, July 17, 2013

Progress on the Cambrian Models GWR Chaired Sleeper Wagons

This is the first workbench update for ages, work has been super hectic and I have been finding it hard to get to do any modelling but I have made some headway with the pair of sleeper wagons.

Last night I fitted the couplings, vac pipes and stanchions to the remaining wagon.

Pete Bevan Cambrian Models GWR Dia T13 Chaired Sleeper Wagon

All that remains before painting is the addition of the lead ballast. The floor of these well wagons runs close to the rail head but there is enough room to squeeze in a layer of lead ballast to enhance the running qualities of the wagons.

Pete Bevan Cambrian Models GWR Dia T13 Chaired Sleeper Wagon

As can be seen from the pic below the clearance isn't huge but just enough.

Pete Bevan Cambrian Models GWR Dia T13 Chaired Sleeper Wagon

This is what I'm currently using for ballast; a piece of battered lead from a gully on a roof that was being replaced, with this piece, I need to flatten it out with a lump hammer and when the time comes, cut into appropriate sized pieces with my tin snips. I normally attach it to the wagons with double sided foam tape, the type that is used to attach plastic trunking to walls. The layer of foam in between the layers of adhesive allow the adhesive to hold even with any unevenness in the lead, it is hard to get it dead flat and this is where the foam helps. On these wagons however, because of the lack of clearances between the floor of the wagon and rail head, I have just super glued the lead in place. If it ever works loose, I will try again with a glue which dries with a bit more flexibility. 

Pete Bevan Lead Ballast Weight


Wednesday, May 01, 2013

Another Old Kit On The Workbench


This time an Ian Kirk offering of a GWR Mink C Dia. V7 Van. Like the Low Siphon it was purchased on ebay, a great source of seemingly unavailable kits but with some patients and the ability to save searches on the mobile app, it isn't too long before older kits like this that are no longer in production come up for sale. If you are into modelling the GWR, then a good source of information regarding both RTR and Kit based offerings is the GWR Modelling site which has lots of information, including the relevant diagram numbers that the models relate to and notes detailing variations that are possible through modification.

One thing to note about the kit which went together quite smoothly is the roof which is formed from a sheet of plasticard rather than being an injection moulded item, which can be seen by the deformation of the roof line as a result of the thin plastic, this will need the addition of laths at each end of the roof to complete and in future would benefit from a roof rolled from brass sheet.

Tuesday, March 19, 2013

Pair of Ratio GWR Open Cs


The vast array of unpainted rolling stock may be accounted by the fact that I haven't got round to getting my airbrush equipment together for a very long time, I am thinking that I might as well get a good batch of models together to paint in one afternoon.

This pair Ratio kits of GWR Dia 08 Open C, whilst being out of production, like some of my other kits, are occasionally available on eBay. Although some are of better quality than others, it is a great way to add interest to a layout and as time passes these kits will become rarer and less seen on the exhibition circuit.

The instructions for the Open C's are not that easy to follow especially when it comes to the break rigging, thankfully Paul Bartlett's site has many examples of British locos and rolling stock to draw information from, the picture of the Dia 08 giving a good idea of the construction of the brake rigging.

From the above photo you will also notice the white metal buffers. These are available from Lanarkshire Models. Available in different versions to suit many prototypes, I find these buffers much better to use than most buffers that are supplied as standard in kits, the ones supplied in kits tend to have a lot of flash and mould lines in undesirable places. The ones supplied in this kit also differ from the prototype.

Saturday, March 16, 2013

Cambrian Models GWR T13 Sleeper Wagon

Pete Bevan Camrian Models GWR T13 Chaired Sleeper Wagon

Another of my current projects on the workbench is a pair of Dia T13 Sleeper wagon for carrying Chaired sleepers used by the permanent way department. Only six of these were built and featured lever handle brakes, self contained buffers, vac piping and screw link couplings. Capable of carrying 160 chaired sleepers I will model it carrying six rows of 26 sleepers tied down using Cambrian Models fine chain (scroll down) which has 33 links per inch and comes in 1m lengths.

Currently the plan is to keep the costs down by using redundant Peco sleepers. As can be seen in one of my previous You Tube videos, I had started a layout using the original Abingdon track plan in the loft of our old house. The trackwork was Peco code 100, passed on to my by my father, supplemented by a few new points. On the move to our new house I have decided to switch to hand built construction using code 75 rail, thus leaving plenty of spare sleepers to play with.

Although the sleepers are not to scale, they are to hand and have moulded chairs saving me time and money in buying scale sleepers and chairs, most of which won't even be seen below the first layer.

The rest of the track will be kept for now, enabling me to put together a basic track to run stock while the building of the trackwork progresses, which will keep my two kids happy! The fiddle yard will also use the Peco track.
Related Posts Plugin for WordPress, Blogger...