Thursday, November 21, 2013

Track Template is ready for construction

After finishing the prep in the house for the arrival of our Au Pair and a bit of a chill afterwards, the last few evenings have been taken up by preparing a more detailed and thorough track template onto which I am going to build my track work.

Tower Street Station Track Template

This is the track template as it stands. I have tidied up the geometry of most of the curves and have added 3.3mm regular sleepers in black and 4mm turnout timbers in green.

I am planning to get it done in one hit and hopefully build it as the lengths bullhead rail come thus keeping track joins to a minimum to increase the rigidity of the track work, well that's the plan anyway! Being a DCC controlled layout there will be a minimum of cuts in the rail, as there will be no isolating sections, just the ones needed at the baseboard joins and on the point work.

The only experience I have had of making any track work is at Cardiff MES, of which I am a member, and have assisted in producing a couple of points on a complicated section of track on the approach to the station on the layout that is currently under construction.

I am a bit of a perfectionist and with the aid of my template I'm sure I will be able to produce some good quality results if I take it one step at a time and don't rush things.

All I need to do now is persuade my find to print it out full size as he did with the track plan and the building will commence!

The track layout of Tower Street station can be found here.

Saturday, October 19, 2013

A new home for Tower Street and the arrival of a small package


The lack of recent posts is due to the imminent arrival of an au pair to our family, we have an Italian girl arriving to help with the kids on the 2nd of November and thus, most of our house has been changed around. The kids have moved from a small bedroom and seperate playroom into a what was the hobbies / office space, we have moved into what was the playroom, which always had our wardrobes in it. Our bedroom will be for the au pair and what was the small kids room is now the office and hobbie space. I was fearing that I would have to loose the ability to keep the layout permanently setup, it is a little crampt in the room but there is enough space for the desk and layout plus a small beuro and a storage unit for paperwork. The room already had a sliding door which means we don't need to keep a space for the door to swing open. Of course, there won't be enough room to have the fiddle yard attached but it doesn't need to be while I am building the track and scenery. 

At long last, arriving today, came my order of 1000 SMP copper clad sleepers and two packs of turnout timbers. I say at long last because like with most things on my todo list I manage to procrastinate and put off what I should be tackling next. It mostly happens with stuff that I have yet to try. Being a perfectionist, I don't like messing things up and I hate the thought of messing on the layout, even though it is my first try and shouldn't worry about making mistakes. It was the same with spraying the first batch of models I had started and the first attempt at applying transfers. Well, they have arrived and with the pack of code 75 bullhead rail I purchased from C&L at the Bristol show, I have no excuse not to start track laying!

Saturday, September 14, 2013

K's Kits GWR 6 Wheel Low Siphon Completed...

... Well mostly completed, again as with the other models I have been working on of late, I have yet to add screw link couplings, but apart  from this, the model is pretty much there.


Pete Bevan's K's Kits GWR 6 Wheel Low Siphon

Talking about screw link couplings, I have been searching the net for some appropriate couplings, I find the Smiths screw links too coarse, using a small  tack as the adjustment bar, other offerings include Romford's which at £4 per pair, are way out of my league, or Scalescenes at £1.00 a pair which are better priced but not as prototypical as the ones available from Roxley Mouldings that work out at just .83p per pair. Smiths do have a Mk2 version of their screw link couplings which are listed on a few websites at around £1.80 per pair but they don't seem to have been released yet.

Pete Bevan's K's Kits GWR 6 Wheel Low Siphon

As can be seen I have added a Bachmann tension lock coupling at one end to improve compatibility which has been placed in a Parkside Dundas NEM mounting block. This will allow me to run guest stock or any stock that I haven't already converted to three link couplings. I have added vac pipes by Romford, and will be posting a tutorial in due course on how to quickly make these from scrap coax and telephone cable.

Pete Bevan's K's Kits GWR 6 Wheel Low Siphon

The paint used was Humbrol enamel matt chocolate brown No.98. In the pics it looks dark and rich but in real life it looks a little lighter and dustier, which I think will look the part once a bit of weathering has been applied. Transfers are from the HMRS Methfix range and went on with ease after Mikkel of the Farthing Layouts fame pointed me in the right direction concerning the tare weight.

As can be seen in a couple of the shots above, I have used some Peco milk churns, the photo below showing how they have been lined up to hide the lead ballast weight. The churns have not been fixed in place yet, I'm waiting until I have finished weathering, I then will secure them to both sides of the van. I'm not sure how accurate the Peco mouldings are but these will be fine as they are mostly hidden from sight.

Pete Bevan's K's Kits GWR Low Siphon  

The 14mm Maunsell wheel sets are by Romford. I have filed off the flanges of the middle wheel set to allow for unhindered running on smaller radius curves, even in the photos above off the track it fillet to both edges to allow the wheel to slide on or off the track as it goes around corners without any noticeable effect.

It is a straight forward Kit to build, although some of the details of the prototype have been left out of the kit, there is plenty of other detail to make an interesting looking model. Keep your eyes peeled on ebay and you may be able to pick one up!


Thursday, August 22, 2013

Detailed Wrenn GWR Dia. X7 Mica B Refrigerated Van


Pete Bevan Detailed Wrenn GWR Dia. X7 Mica B Refrigerator Van

I picked up this Mica B a couple of years ago on ebay, did nothing with it until this week.


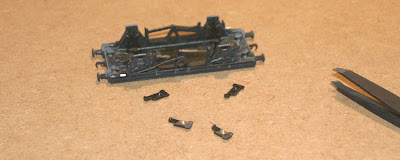
This is the model in its original unpainted condition, mine was grubbier than this. The first thing I did was to remove the existing lettering then dismantled the model, sprayed the underframe black and painted the brake handle white. 

After this I added bearings to the little plastic inserts and fixed some extra ballast in the way of lead strip. The underframe is a one piece metal casting and the inserts provide a way of installing the wheel sets as there is no way that the axle boxes can be bent out to slip them in place.

Pete Bevan Detailed Wrenn GWR Dia. X7 Mica B Refrigerator Van Underframe

After this attention turned to the body which received a couple of coats of white while the roof was repainted grey, followed by painting the detail on the door fasteners, handles and the steps on the ends.


Pete Bevan Detailed Wrenn GWR Dia. X7 Mica B Refrigerator Van In Progress

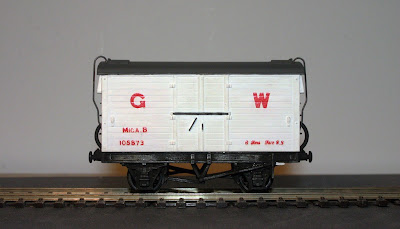
Next came the transfers, with which I copied the livery of the Mica B at the Severn Valley Railway.

Pete Bevan Detailed Wrenn GWR Dia. X7 Mica B Refrigerator Van

Romford vac pipes were added as were the coupling hooks ready for some Smiths Mk 2 screw link couplings. Finally the grab rails were repositioned, the cast instruction plates on the ends of the van were painted red and new wheel sets were fitted.

Pete Bevan Detailed Wrenn GWR Dia. X7 Mica B Refrigerator Van

Obviously this won't pass as a fine scale model but I have enjoyed the detailing process and breathing some new life into this RTR offering.

Tuesday, August 06, 2013

My First Pair of Wagons Completed!


Pete Bevan's Cambrian Models GWR Dia. T13 Chaired Sleeper Wagons

After all this time, I have finally completed my first pair of wagons! A pair of Cambrian Models GWR Dia. T13 Chaired Sleeper wagons. After the previous rush of primed wagons, I pushed straight on to painting these in black.

Pete Bevan's Cambrian Models GWR Dia. T13 Chaired Sleeper Wagons


There seems to be some doubt that engineers wagons were actually painted black, but all of the ones that I have seen photos of in preservation are in black livery. The lettering schemes tend to differ too and in the end I mostly followed the instructions that came with the kit.

I have never attempted to number a wagon before and I'm quite pleased with my efforts. I could have chosen an easier model to start with, the delicate stanchions and tight spaces certainly made it more tricky than it could have been!

Pete Bevan's Cambrian Models GWR Dia. T13 Chaired Sleeper Wagons


I used HMSR Methfix transfers which I am happy with and will probably use from now on unless there is a specific transfer I need that isn't catered for in the HMRS range. Applying the tare and running numbers took an age, the numbers being 100712 and 100716, applying each number individually then waiting for the meths to dry and washing off the backing paper and waiting for that to dry before starting on the next number. The numbers on the ends were started on the left and right and met in the middle to speed those ones up a bit.

Overall I am happy with the way the wagons have turned out. All that is left to do is to fix some screw link couplings in place and to do some weathering, oh and make up the all important chaired sleeper load!

Thursday, August 01, 2013

Prime Time Viewing


As promised, I have actually primed my first batch of wagons. Here we have two Ratio iron minks, two Ratio open C tube wagons, two Cambrian Models Dia. N30 loco coal wagons, a Cooper Craft Dia. 04 open five plank wagon with sheet rail, another Cooper Craft open, this time a Dia. 05 open 4 plank wagon, a Cooper Craft Dia. V5 Mink Van, Also here is the Ian Kirk V7 Mink C van described in a previous post and the underframe of a Mainline Mogo van, on which I have replaced the original couplings with three links.

I used Halfords grey plastic primer from a can which went on nice and easily, the primer has really bought out a lot of the details, especially the rivet detail on the iron minks. The flat finish showing the relief of the mouldings much better than the satin finish of the plastic.


I have also sprayed the two Cambrian Models Dia. T13 Chaired Sleeper wagons, below is a sneak peek of the black finish and progress of applying the transfers.


Next post I hope to show the finished sleeper wagons...

Saturday, July 20, 2013

Larkrail by Rail...

...and Bus


I took the train over to Bath today to visit Larkrail, this years guise of Camrail. Described as a small show by its organisers, it however, did not fail to impress with a good selection of smaller layouts on show, including Chris Nevard's Polbrook Gurney Colliery, several demonstration stands of work in progress and a couple of traders. I will be honest in saying that the main draw for me going to the show was Polbrook Gurney and was more than worth the wait to see it in the flesh. I won't be posting any pics here as they won't be anywhere near the quality found in the link, but it is well worth going to see if you have the chance. 

Overall it was a very high quality show for its size and I had a great day out!

Wednesday, July 17, 2013

Progress on the Cambrian Models GWR Chaired Sleeper Wagons

This is the first workbench update for ages, work has been super hectic and I have been finding it hard to get to do any modelling but I have made some headway with the pair of sleeper wagons.

Last night I fitted the couplings, vac pipes and stanchions to the remaining wagon.

Pete Bevan Cambrian Models GWR Dia T13 Chaired Sleeper Wagon

All that remains before painting is the addition of the lead ballast. The floor of these well wagons runs close to the rail head but there is enough room to squeeze in a layer of lead ballast to enhance the running qualities of the wagons.

Pete Bevan Cambrian Models GWR Dia T13 Chaired Sleeper Wagon

As can be seen from the pic below the clearance isn't huge but just enough.

Pete Bevan Cambrian Models GWR Dia T13 Chaired Sleeper Wagon

This is what I'm currently using for ballast; a piece of battered lead from a gully on a roof that was being replaced, with this piece, I need to flatten it out with a lump hammer and when the time comes, cut into appropriate sized pieces with my tin snips. I normally attach it to the wagons with double sided foam tape, the type that is used to attach plastic trunking to walls. The layer of foam in between the layers of adhesive allow the adhesive to hold even with any unevenness in the lead, it is hard to get it dead flat and this is where the foam helps. On these wagons however, because of the lack of clearances between the floor of the wagon and rail head, I have just super glued the lead in place. If it ever works loose, I will try again with a glue which dries with a bit more flexibility. 

Pete Bevan Lead Ballast Weight


Sunday, June 16, 2013

The Underlying Debate

This week I ordered a sheet of closed cell foam, a pot of Copydex and my first and hopefully last set of track gauges. Reading Mikkel's blog, and the debate over on RMweb, about the best materials and practices to achieve good sound deadening results from track underlay. It seems that approaches vary from using no underlay at all, to using cork stuck down with PVA, to the use of closed cell foam stuck down with Copydex. C&L Finescale sell a foam underlay as do Nairnshire Modelling Supplies, but I managed to get some on ebay which has the adhesive already applied, effectively coming as sticky backed plastic. It took less than 30 minutes to mark, cut and apply the underlay to the baseboards.


For track laying and ballasting I have opted to use Copydex. Comments in the RMweb conversation suggest that PVA soaks into the cork or foam and dries rock solid, negating any sound deadening properties of the material used. As Copydex is a latex based product there should be a little give when dry which should enhance the sound deadening qualities of the closed cell foam, which on ebay is even advertised as ideal for sound insulation. In due course I will do some tests and hopefully a video comparing the sound levels of track laid straight onto a board compared with track glued down to foam underlay using Copydex. The other advantage of using the sticky backed foam is that it is a doddle to cut and peal back, so placing the buildings and making sure there is no dreaded gap at the base should be easy!


Also in the pictures you will see the platform. This was started a couple of years ago when I was building a layout in the loft of our old house. It was, again, based on Abingdon Station but was not compromised in any way from then plan which can be found here I didn't get very far down the line before we decided to move house and because I had built the boards directly onto the rafters rather than as separate units, the platform and a couple of familiar Ratio and Wills kits are as much as I managed to keep from the project. I do however have an abundance of Peco streamline code 100 points and flexi track which will be utilised for a basic roundy roundy railway in the back garden for my Son (Dad too of course!!)

Friday, May 31, 2013

The Completed Baseboards


With a busy schedule, again progress has been slow, but I am glad to say that at last, the two baseboards are complete and have been joined using fixings from a redundant bed from work that was at the end of its life (I manage rented accommodation for students and young professionals).

Back in the kitchen workshop, (only available when my better half is out of the house) and as with the last board, I started by gluing and screwing the end rails and the straight back rail to the baseboard top.


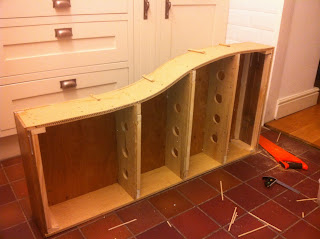
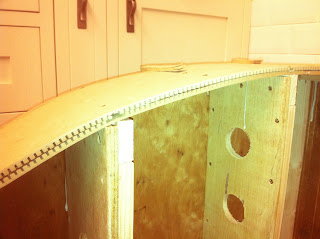
After this I added the cross members and came to the front rail with the compound curve in it. As mentioned before the plan was to use two layers of 6mm bendy MDF laminating them to form the curve.

Tower Street Station Baseboards Under Construction

While cutting the wood I allowed an extra millimetre clearance should any discrepancy's happen, in the end the MDF soaked up the PVA and expanded quite a lot, I managed to hold most of the expansion screwing small batons over the relevant places. Where I was not able to do this the deviance from the original curve has only been 1 or 2mm at most. At leaset all of this will be covered by the final profile board! Next time I will experiment with just one layer of bendy MDF as I don't think the rigidity of the overall structure will be compromised too much.

Tower Street Station Baseboards Under Construction

Next the bottom board was glued and screwed in place and again access holes were cut using the jigsaw. The two boards were then taken back up to the hobbies room and clamped together ready to drill the holes for the metal inserts.

Tower Street Station Baseboards Under Construction

M5 socket head bolts to match the inserts were also salvaged from the bed. I managed to get a total of 16 inserts and plenty of screws allowing four bolts per baseboard join to be used. The one thread from each of the pairs of inserts have been drilled out to 6mm so that the bolt can pass through. I did this so that the head of the bolt has a hard surface to bare against rather than just the wood and to prevent he hole from being enlarged by the thread of the bolt. I had designed a version of the pattern makers dowel, which are recommended by John de Frayssinet of County Gate fame, the only difference being they would be large enough to have a hole through the centre to accommodate an M6 or M8 bolt. I will save that design for my next project!

Tower Street Station Baseboard Fixings


Tower Street Station Baseboards and Layout

Next up...

I need to decide which surface to build the track on. Chris Nevard, in his recent article in Model Rail, recommends making the track directly on the top of the baseboard by drawing the track layout on the board, gluing the sleepers down and once dry, soldering the track in place. Another method I have used in conjunction with Alan French at Cardiff MES, is to stick the sleepers to the printed track plan with double sided tape and to solder the track to the sleepers, once assembled pulling away the paper backing and pinning & gluing the whole lot down.

Again, writing the blog and airing various ways of doing things really puts things into perspective and Chris's method starts to seem much more simple and straight forward!!

This is my first layout, and while having helped to make a couple of points at the club, I don't have much experience of copper clad construction, so please do comment if you have any top tips or any other methods of producing the copper clad track work.

Sunday, May 12, 2013

The Kitchen Workshop

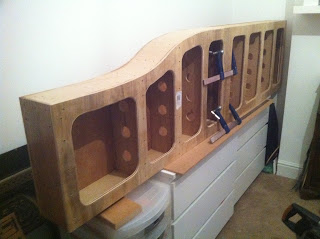
It has taken what seems like a lifetime, but at last, one of the baseboards is finished. I might however add some hand holes to aid transportation, but can be done retrospectively. The kitchen has been employed as my makeshift workshop of late as, although the cutting and routing have taken place outside, most of the construction has been done inside to avoid the bad weather!

First off I routed the rebates into the end rails and cut the holes in the cross members.


I then glued and screwed baton to both of the above to enable a good fix to the top & bottom boards and the side rails.

Next I fixed one end rail to both side rails and fixed the top board down to the end rail, matching the end of the board with the rail. I then fixed the other end rail to the top board again making sure the end of the board and the rail were in alignment lengthwise. I then fixed the side rails to the end rails ensuring everything was in alignment.

I could have glued and screwed the end rails and side rails together to start, then added the top board, but I felt it was better to align everything with the top board using that as the datum as I went along to ensure higher accuracy.


After the end rails were in place I fixed the cross members in place and added the bottom board, effectively making it a closed box with no way in...


...Apart from, of course, adding the access holes in the bottom. 


And there you have it! One monocoque baseboard that should stand the test of time and hopefully some rounds on the exhibition circuit!! 

Next up: baseboard two. 

Wednesday, May 01, 2013

Another Old Kit On The Workbench


This time an Ian Kirk offering of a GWR Mink C Dia. V7 Van. Like the Low Siphon it was purchased on ebay, a great source of seemingly unavailable kits but with some patients and the ability to save searches on the mobile app, it isn't too long before older kits like this that are no longer in production come up for sale. If you are into modelling the GWR, then a good source of information regarding both RTR and Kit based offerings is the GWR Modelling site which has lots of information, including the relevant diagram numbers that the models relate to and notes detailing variations that are possible through modification.

One thing to note about the kit which went together quite smoothly is the roof which is formed from a sheet of plasticard rather than being an injection moulded item, which can be seen by the deformation of the roof line as a result of the thin plastic, this will need the addition of laths at each end of the roof to complete and in future would benefit from a roof rolled from brass sheet.

Sunday, April 21, 2013

Sunny Saturday

What better thing to do on a sunny Saturday afternoon when your Mum and Dad are down, than to do some DIY and work on the layout! After botching about widening the door frame of our bedroom and finishing hanging the bathroom door, I managed to have enough time to make a jig and cut the curved boards to size. One of the great things of being the man about the house, is that whatever I am doing with a power tool, it looks like DIY, so when my wife comes out to see how we are doing, it doesn't even enter her head to ask what I'm up to and check that I am still doing the DIY rather than messing about with trains.

First up, I made a template by scribing along the cut of the plot on some spare 12mm ply left over from the side rails, I was going to use some spare laminate but this was too thin and would have made the guide bush on the base of the router sit on the sheet to be cut. I then cut the template using my jigsaw and made sure it was smooth using 80 grit sandpaper.

I then clamped the two sheets at the back making sure they were in line and clamped the jig to the front of the boards 8.5mm from the cut line. The 8.5mm offset is the difference between the diameter of the 30mm guide bush and the 12.7mm (1/2") cutter. Really speaking the measurement should be 8.65mm but I'm not going to split hairs over 0.15mm!

So away I went routing the curve. All was going well until the last pass of the router when I pushed too far and the guide bush went over the end of the template and gave a nice semi circular dent on the edge of my board! Oh well, nothing a bit of filler can't cure later on!


Wednesday, April 17, 2013

Progress at last...

What with the lingering cold weather, a busy family schedule and our rental house needing a complete redecorate, the layout has been on the back burner for a few weeks.

During this time though, I have managed to get the image file across to my friend Andrew Denholm, who has done a splendid job of printing a full size plot of the layout. This will be used as the template on which I will build the track. I mistakenly left in the shaded footprints of two Class 121s and a class 108, which were covering two of the turnouts. I will be need to print out the portions on an A4 sheet and tape them over the offending areas.
The plot arrived on Monday night and was duly unfurled on the floor to check it out, it happens to be millimetre perfect, more perfect then the boards cut by B&Q on they're super duper vertical saw table thingamajig!!

The plan was laid over the top sheet of the left baseboard, taped down and cut using a knife, thus leaving a mark on the board where the curved edge should be cut, the line being overmarked with a pencil. The plan was then taped to the inside face of the bottom sheet of the baseboard and the pencil line repeated.

I have not yet decided how I am going to cut the boards. Ideally I would clamp both boards together and cut them together allowing the both curves to match.

As can be seen in the picture above, I have achieved good results with my domestic (green, as opposed to the industrial blue) Bosch jig saw, which has a good range of blades to choose from, but the one problem I have is that when cutting anything over about 15mm the blade tends to bend a little, resulting in out of square cuts, seen below on the 25mm MDF that makes up my workbench.
                                                                                                                                                     
The alternative would be to make a template using some spare laminate left over from a previous customers job to use with my router, the only difficulty being that the template needs to be cut 8.5mm inside the finished edge to allow for the offset created by the routers guide bush.

The end of our kitchen worktop was created in this way. I spent ages trying to find the centre of the radius on the curved unit and couldn't find one, it then dawned on me that there was no one single radius, but the curve was constantly changing template. (Who designs a kitchen unit without a fixed radius and supplies it without a template so that the kitchen fitter, in this case me, needs to make a bespoke template wasting time in the process??? (Rant Over!)) So I set to creating a template scribed from top of the actual unit, subtracting the 8.5mm clearance needed  for the guide bush and came up with the result below.
As I am typing, the second option seems more and more like the one I need to pursue. It will take more time but it will mean that when trying to mate up the top and bottom boards with the bendy MDF side rail I will know that they are identical and won't have to faff about trying to match two bards that are out of square with one another.

Update to follow...
Related Posts Plugin for WordPress, Blogger...